

How to configure ACFS File System in RAC using GI 19c
ACFS i.e Oracle ASM Cluster File System is cluster file system service used for High availability services.
Example – For achieving high availability in goldenate for Oracle RAC, we can use ACFS for goldengate relate files
ENVIRONMENT DETAILS:
ORACLE GRID VERSION – 19.7.0
NODES               – node1 , node2
OS                  – OEL7
First we need to make sure the GI Home is patched with the latest version
Patching Node1 and Node2
These can be downloaded from MOS, we need GI RU and OPatch patch.
#GI 19c Patch Number 31305339
p31305339_190000_Linux-x86-64.zip
#OPatch version
p6880880_190000_Linux-x86-64.zipReplace the GRID_HOME/Opatch with the latest one and set up the env bars.
export ORACLE_HOME=/u01/app/grid
export PATH=$ORACLE_HOME/bin:$PATH
unzip the patch 31305339 and check that everything is fine
unzip -q p31305339_190000_Linux-x86-64.zip
//the above created /home/oracle/31305339
Node1
Then execute to check that everything is ok
cd $ORACLE_HOME/OPatch
sudo ./opatchauto apply /home/oracle/31305339 -analyze -oh /u01/app/grid
Then
cd $ORACLE_HOME/OPatch
sudo ./opatchauto apply /home/oracle/31305339 -oh /u01/app/grid
Node2
This will fix the problem described here
/u01/app/grid/oui/bin/runInstaller -silent -ignoreSysPrereqs -attachHome ORACLE_HOME="/u01/app/grid" ORACLE_HOME_NAME="OraGI19Home1" CRS=trueThen just patch it
export ORACLE_HOME=/u01/app/grid
sudo ./opatchauto apply /home/oracle/31305339 -oh /u01/app/grid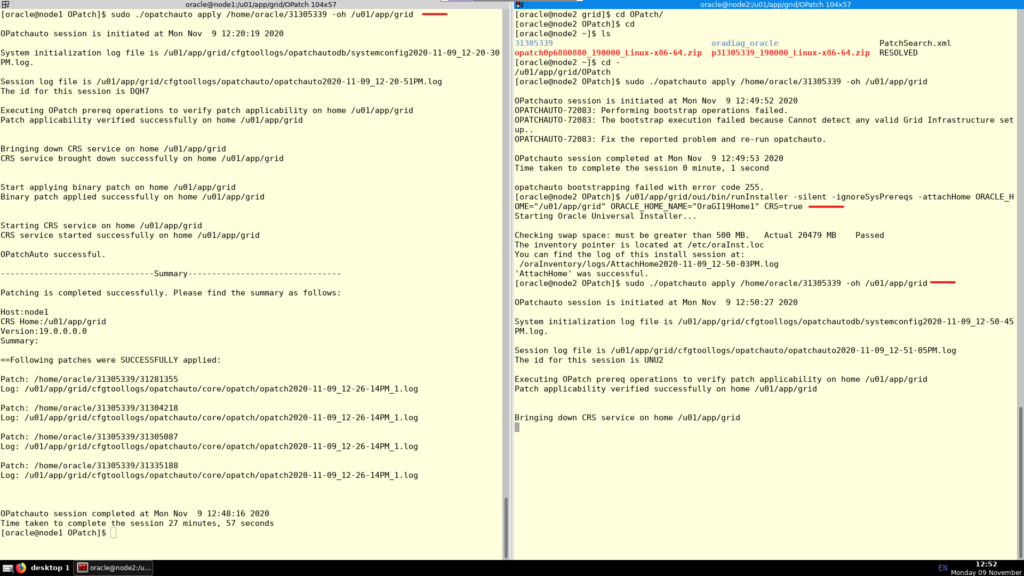
Additional steps
Then we need to workaround a bug, explanation here
Node1
sudo su -
export ORACLE_HOME=/u01/app/grid
export PATH=$ORACLE_HOME/bin:$PATH
crsctl set resource use 1
#then
crsctl disable has
crsctl stop has
crsctl enable has
crsctl start has
Node2
sudo su -
export ORACLE_HOME=/u01/app/grid
export PATH=$ORACLE_HOME/bin:$PATH
crsctl set resource use 1
#then
crsctl disable has
crsctl stop has
crsctl enable has
crsctl start has
ACFS configuration
Configuring the ACFS filesystem
Node1
sudo mkdir -p /u01/app/fs
sudo chown oracle:oinstall /u01/app/fs
Node2
sudo mkdir -p /u01/app/fs
sudo chown oracle:oinstall /u01/app/fs
Create an ASM DISKGROUP
Set env vars and list disc candidates
asmcmd lsdsk --candidate -p#on node1
export ORACLE_HOME=/u01/app/grid
export PATH=$ORACLE_HOME/bin:$PATH
export ORACLE_SID=+ASM1create ~/hatake.xml with the below content
<dg name="HATAKE" redundancy="external">
   <dsk string="/dev/oracleasm/asm-disk4"/>
   <dsk string="/dev/oracleasm/asm-disk5"/>
   <dsk string="/dev/oracleasm/asm-disk6"/>
   <a name="compatible.asm" value="19.0.0.0.0" />
   <a name="compatible.rdbms" value="19.0.0.0.0" />
</dg>
if advm is in use it cal also be added, not needed for this example
<a name="compatible.advm" value="19.0.0.0.0" />then within asmcmd execute
asmcmd
>mkdg hatake.xml
>lsdg
Mount the diskgroup from other nodes
srvctl start diskgroup -diskgroup HATAKE -n node1,node2Create a new volume KAKASHIVOL1 in the diskgroup HATAKE
#asmcmd
volcreate -G HATAKE -s 57G KAKASHIVOL1
volinfo --all
[oracle@node1 ~]$ asmcmd
ASMCMD> volinfo --all
no volumes found
ASMCMD> volcreate -G HATAKE -s 57G KAKASHIVOL1
ASMCMD> volinfo --all
Diskgroup Name: HATAKE
Volume Name: KAKASHIVOL1
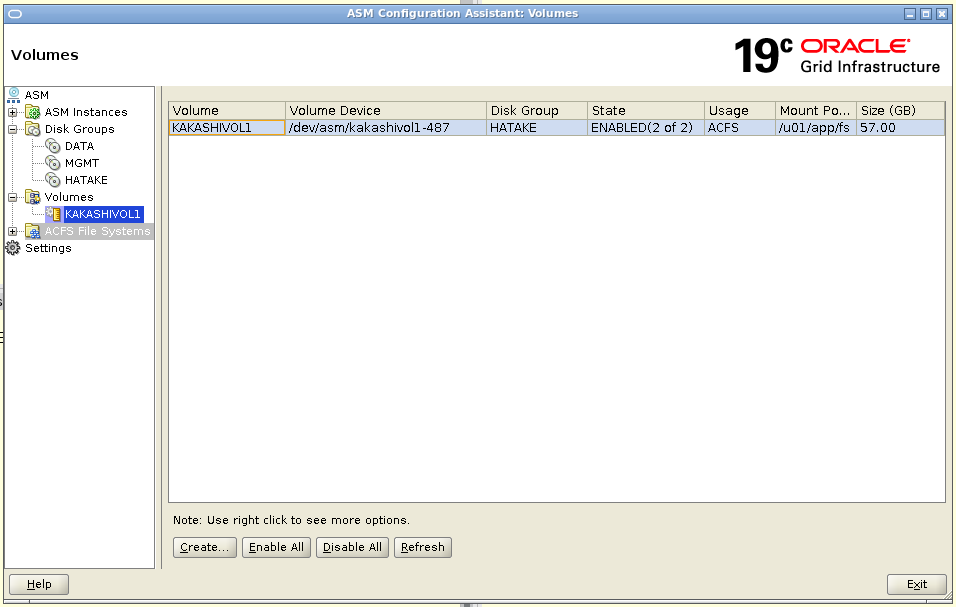
Volume Device: /dev/asm/kakashivol1-412 <---- This is the volume device
State: ENABLED
Size (MB): 58368
Resize Unit (MB): 64
Redundancy: UNPROT
Stripe Columns: 8
Stripe Width (K): 1024
Usage:
Mountpath: export VOLUME_NAME=`asmcmd volinfo --all | grep "Volume Device:" | awk -F': ' '{print $2}'`
echo $VOLUME_NAMECheck that the mount point was successfully created
crsctl stat res ora.HATAKE.KAKASHIVOL1.advm -t[oracle@node1 ~]$ crsctl stat res ora.HATAKE.KAKASHIVOL1.advm -t
--------------------------------------------------------------------------------
Name Target State Server State details
--------------------------------------------------------------------------------
Local Resources
--------------------------------------------------------------------------------
ora.HATAKE.KAKASHIVOL1.advm
ONLINE ONLINE node1 STABLE
ONLINE ONLINE node2 STABLE
--------------------------------------------------------------------------------
[oracle@node1 ~]$
Create ACFS FILESYSTEM In the KAKASHIVOL1 VOLUME
sudo /sbin/mkfs -t acfs $VOLUME_NAME[oracle@node1 ~]$ sudo /sbin/mkfs -t acfs $VOLUME_NAME
mkfs.acfs: version = 19.0.0.0.0
mkfs.acfs: on-disk version = 39.0
mkfs.acfs: volume = /dev/asm/kakashivol1-412
mkfs.acfs: volume size = 61203283968 ( 57.00 GB )
mkfs.acfs: Format complete.
[oracle@node1 ~]$
Register the ACFS file system with CRS
sudo $ORACLE_HOME/bin/srvctl add filesystem -d $VOLUME_NAME -m /u01/app/fs -u oracle -fstype ACFS -autostart ALWAYSCheck the resource status
crsctl stat res ora.hatake.kakashivol1.acfs -t[oracle@node1 ~]$ crsctl stat res ora.hatake.kakashivol1.acfs -t
--------------------------------------------------------------------------------
Name Target State Server State details
--------------------------------------------------------------------------------
Local Resources
--------------------------------------------------------------------------------
ora.hatake.kakashivol1.acfs
OFFLINE OFFLINE node1 STABLE
OFFLINE OFFLINE node2 STABLE
--------------------------------------------------------------------------------
[oracle@node1 ~]$Start the ACFS file system resource
sudo $ORACLE_HOME/bin/srvctl start filesystem -d $VOLUME_NAME[oracle@node1 ~]$ crsctl stat res ora.hatake.kakashivol1.acfs -t
--------------------------------------------------------------------------------
Name Target State Server State details
--------------------------------------------------------------------------------
Local Resources
--------------------------------------------------------------------------------
ora.hatake.kakashivol1.acfs
ONLINE ONLINE node1 mounted on /acfspoc,
STABLE
ONLINE ONLINE node2 mounted on /acfspoc,
STABLE
--------------------------------------------------------------------------------
[oracle@node1 ~]$ Now validate the ACFS mount points
srvctl config filesystem[oracle@node1 ~]$ srvctl config filesystem
Volume device: /dev/asm/kakashivol1-412
Diskgroup name: hatake
Volume name: kakashivol1
Canonical volume device: /dev/asm/kakashivol1-412
Accelerator volume devices:
Mountpoint path: /u01/app/fs
Mount point owner: oracle
Mount point group: oinstall
Mount permissions: owner:oracle:rwx,pgrp:oinstall:r-x,other::r-x
Mount users:
Type: ACFS
Mount options:
Description:
ACFS file system is enabled
ACFS file system is individually enabled on nodes:
ACFS file system is individually disabled on nodes:
verify everything worked fine
#node1
[oracle@node1 ~]$ df -kh /u01/app/fs
Filesystem                Size  Used Avail Use% Mounted on
/dev/asm/kakashivol1-412   57G  193M   57G   1% /acfspoc
#node2
[oracle@node2 OPatch]$ df -kh /u01/app/fs
Filesystem                Size  Used Avail Use% Mounted on
/dev/asm/kakashivol1-412   57G  193M   57G   1% /acfspoc
#node1
[oracle@node1 ~]$ cd /u01/app/fs
[oracle@node1 acfspoc]$ touch fred.is_cool
#node2
[oracle@node2 OPatch]$ ls -l /u01/app/fs
total 64
-rw-r--r-- 1 oracle oinstall     0 Nov  9 18:33 fred.is_cool
drwx------ 2 root   root     65536 Nov  9 18:30 lost+found
Hi.
First of all – great post!
I have some issue with ASMCA 19c – I am new to this version.
I wanted to create an ACFS volume on already existing diskgroup (FRA) using ASMCA 19c but when I open the GUI I am not seeing Volumes option in the tree.
Do you have any idea why is that?
Thanks.
Hi There,
Make sure ASM and ACFS are configured and running properly. Use srvctl status asm and acfschkdsk -n to verify.
The Volumes option may not show up in ASMCA until an ASM diskgroup is selected. Try expanding the diskgroups in the tree and selecting one first.
Check that the COMPATIBLE.ADVM attribute is set to 19.0 or higher for the diskgroup. You can use asmca or asmcmd to check and set this.
The user running ASMCA needs proper privileges to create volumes. Make sure the user has been granted the asm_volume_admin and asm_volume_create roles.
Try restarting the ASM and ACFS services using srvctl restart asm if the Volumes option still does not appear.
you can always open a support ticket to get help 🙂 try asking to https://www.linkedin.com/in/mikedietrich he can point you to the right direction