

Creating video storage system [part3]
The third part of the tutorial of how to create a custom distributed video storage system to save the video of an IP camera on the cloud for free (and finally some code).

On the part 1 we created some virtual infrastructure which will be used for the production deployment as well as a VM for testing purposes.

On part 2 we created the the setup on the Raspberry.
In this part, I will show how the code looks and also talk about the reasoning behind it but without copying and pasting the code because let’s face it, that is kind of boring, if you want to examine the code you can clone the source code :).
Staging configuration
For the testing of the code I used a CentOS 7 VM machine clones twice, one is called worstation and the second is called remotevm
CentOS 7
workstation
192.168.1.97
CentOS 7
remotevm
192.168.1.98
The remotevm will act as the real server, on the real version will be pretty much the same, thanks to the VPN we can access to its VPN ip directly whereas locally both VMs will be on the same network.

In order to accomplish this, they should be configured as bridge and they both should have different mac addresses, it is an option when you cloning the VM.

It also can be changed after the clone was done on the advanced network settings, they need to be in bridge in order to the workstation can see the onvif camera.
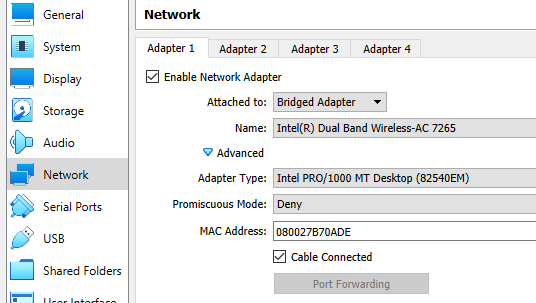
Once everything is ready, you should be able to ping back and forth both VMs, do not forget to configure the firewall properly or you may have connection issue due to the onvif protocol requires the camera discover to establish a SOPA connection with the client and if all the ports are closed the code won’t be able to talk to the camera.
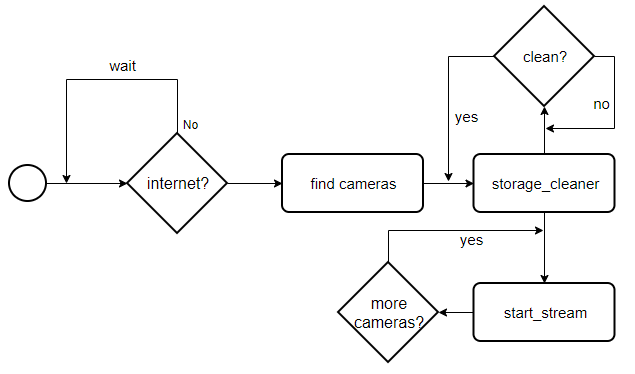
iStream architecture
The software I made to backup the stream has very simple constraints, it had to:
- be easy to manage through CLI
- be light (low CPU and RAM fingerprint)
- lose as less information as possible
- be flexible
After some research and a lot of reflexition and decided to pick JS and NodeJS as the main stack even though I have more experience on other languages such as Java, Python and Rust, the protocol we will work with is way old which leave us only with the onvif specification to work with that means, you need to recreate the SOAP calls based on it (which is not going to happen because I have life).
Besides the above mentioned, the existing libraries that you will find for Java for example are very strict which means that if the device you are trying to connect responds with a missing field they will just explode with a parsing exception but no JS (actually I tried to make it with Java but didn’t go well).
JS is way flexible more than it should which works for us because the chinense camera I have is of questionable quality and I suspect it does not follow the onvif standard (which I’m sure is a common practice for most camera makers out there)
The iStream process works as follow.
Installation
During the software installation there are multiple things that needs to be configured such as:
- Install node
- Install the istream command in the system
- configure passwordless ssh between the nodes
- create a service for the sshfs remote partition
- create a service for the istream management
The installation process has been simplified by the creation of a script called
$ISTREAM_HOME/scripts/centos7_install.sh
$ISTREAM_HOME/scripts/raspbian_install.sh
the script must be run as root (or with sudo), the information to the installer is passed through a .env file
#
camera information (needs to be set prior the conection)
#
camera user
export CAM_USER=changeme
camera password
export CAM_PASS=changeme
#
remote server settings
#
remote server IP
export REMOTE_SERVER_ADDRES=192.168.1.98
remote server user
export REMOTE_SERVER_USER=john
remote server password
export REMOTE_SERVER_PASS=doe
where will be stored the videos
export REMOTE_SERVER_DIRECTORY=/tmp
#
local server settings
#
where will be mounted the remote directory in the local machine
export LOCAL_SERVER_DIRECTORY=${HOME}/video
where to save the video is the internet is gone (unused for now)
export LOCAL_SERVER_BACKUP_DIRECTORY=${HOME}/bkvideo
warning, this will remove the current $HOME/.ssh/id_pub
export CONFIGURE_PASSWORDLESS_SSH=no
user to configure the processes with
export LOCAL_USERNAME=${USER}
target NIC where to broadcast for cameras, empty for all, it may fail when VPNs are in usage
export BROADCAST_NIC=all
#
app settings
#
how often will the soratge cleaner be fired
export CLEAN_DIR_INTERVAL=10
max space to be used in MB
export MAX_USED_SPACE=15
if there is no internet, how often should the code try to reconnect
export RECONNECT_INTERVAL=2
how much each stream segment last in seconds
export SEGMENT_DURATION=60
you can just copy .env.src and edit the file
Process management
The whole process is controlled through systemd as a service, this way we can easily:
- start it on boot (configured by the installer)
- stop|start it manually just a through ssh connection.
istream command
Once the project was cloned and installed, the core will be under $ISTREAM_HOME/cmds in such folder you will find different files, each file is a command that can be run independently, this way it run by parts to make easier to identify if there is a problem with any part of the process, after the installer ran, you can execute stream -h from any terminal to see the options.

The command which is run by the istream.service is ignite, the code is designed to avoid any encoding task to make the raspberry pi able to handle many cameras without big effort.
Internally the hard work is done by ffpmeg which is receiving the stream and just writing onto a video split by segments of ${SEGMENT_DURATION} seconds within a folder mounted through sshfs, this way if the cameras are destroyed, we will be able to see the latest info recorded.
The segments will allow us to free the space of the old records and keeping only the latest ${MAX_USED_SPACE} MB of video, on my device (720p video at 19 fps) it means
66MB ~ 1 Hour
330MB ~ 5 Hours
which is good enough, the free VM we got from Oracle has 20GB of storage plus 100GB of block storage, it can afford around 30 days of video only on the VM, we are good to go 😀
various considerations
Although sshfs is good because it is easy to use, due to the encryption it may be slow when it is submitted to a lot of throughput, nevertheless, this is not my case, but if you run into issues you may want to replace it by a full NAS partition.
Why not using a docker? actually, it is a valid option but the development was kind of hard, there is no way to test your code because you need to emulate an ARM71 processor, and when I tried to run it with qemu it became to make the development harded which is a bad signal, that is why is stopped.
Some workarounds for production, you might need to temporarily enable password authentication on the server to allow the script to work fine
Source code
it can be downloaded from here.
https://github.com/donhk/istream
Here a video of a staging deployment
here is how the storage folder looks like after a few hours

Production deployment
During the production deployment I faces some issues with the library I used for the onvif communication, it seems is has some issues when it is run a system with multiples NICs, nevertheless, after some pain I manage to fix the issue (add actually submitted a pull request) in the meantime I recommend to use my forked version which already has the fix in place 😀


something to hear whereas you hack :3
One thought on “Creating video storage system [part3]”