

Creating a video storage system [part1]

This tutorial was created for me as part of a small effort to create a small server to backup the information of an IP camera I bought which does not have a built in ftp client and only can record the information on its internal memory.
The camera is the model RCA rc130n nothing special, just a cheap Chinese toy that you will find under different names/brands.

As it usually happens the software support is limited but since we are engineers we can do something about it, the idea is to be able to have the stream produced by the device being stored on the server, this way, in case the camera is destroyed we will still be able to get the information that it generated.
Project stack
The hardware stack of this project will be the following:
- Wireless IP Camera (Onvif)
- Wireless router
- Raspberry pi (or anything low-power-usage that you can program)
- Server that will remotely store the info

Basically, the camera will connect to the wifi, then the raspberry will run a software that will connect to the camera through the onvif standard and will send the video to the remote server.
Note
There are lots of tutorials out there that shows how to connect a raspberry pi and a video camera, however, this is going to be different because the camera is not a plug&play toy pre-configured to run with a pi
The only constrains that I have set are related to cost, this needs to be a cheap solution otherwise it won’t be attractive, who want’s to pay some bucks a month for having a cheap camera saving info in the cloud that probably almost never is going to be useful, only once very six months or so (when I’m on vacations) fortunately there is way of getting this for free (there are services like this already but are subscription-based and who wants to pay when you can build them :D).
Creating the VPN on Oracle Cloud
Creating the server
The first thing we will do is create the virtual VM on the Oracle Cloud (OC) to avoid spending money on a custom VPS 😉
Withing the Oracle Cloud control panel we will run the following actions.


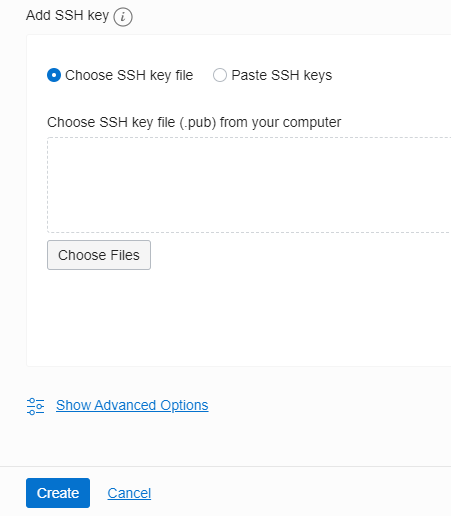
Make sure you add a public ssh key of the client from which you want to connect during the VM creation or you won’t be able to log in later

once the VM is ready, we need to configure some ingress rules to allow the incoming traffic from the client through the port 1194 click on the Virtual Cloud Network (VCN), it will take you the VCN config options and hit the add ingress rules button

And add one with the following options

This is all what we need to do from this panel, now you can connect to the VM from your terminal using the opc user (default user created by OC) in this case I’m logging using my private key

Configuring the Firewall
By default the VMs created in the OC already have running the firewall, notice that the firewall of the VM and the rules created in the previous step are different things, besides giving access through the GUI we also need to configure the firewall.
Check it is running with the below command

check the existing interfaces, notice that the IP address is no t the same that you use to log in within the VM, that’s because we are going through a NAT

The below command tell the firewall how to behave with the VPN traffic
firewall-cmd --add-masquerade
firewall-cmd --permanent --add-masquerade
SHARK=$(ip route get 8.8.8.8 | awk 'NR==1 {print $(NF-2)}')
sudo firewall-cmd --permanent --direct --passthrough ipv4 -t nat -A POSTROUTING -s 10.8.0.0/24 -o $SHARK -j MASQUERADE
firewall-cmd --reload
firewall-cmd --zone=public --add-port=1194/tcp
Now add the below line in /etc/sysctl.conf
net.ipv4.ip_forward = 1and restart the service, using
systemctl restart network.serviceif you get an error due to an “already running dnsclient” just kill the process and run the restart again.
Configuring OpenVPN
The following steps need to be run with root user (or with sudo but you need to type more :v)
sudo su -
yum update -y
yum install -y openvpn htop iotop iftop
modprobe tun
The next step is to install Easy-RSA for the certificates creation
wget -O /tmp/easyrsa https://github.com/OpenVPN/easy-rsa-old/archive/2.3.3.tar.gz
mkdir /etc/openvpn/easy-rsa
cp -rf easy-rsa-old-2.3.3/easy-rsa/2.0/* /etc/openvpn/easy-rsa
chown opc /etc/openvpn/easy-rsa/
exit
Now we can continue as the opc user, we will create the below file to configure the server
sudo vim /etc/openvpn/server.confadd the below content
port 1194
proto tcp
dev tun
ca ca.crt
cert server.crt
key server.key  # This file should be kept secret
dh dh2048.pem
topology subnet
server 10.8.0.0 255.255.255.0
ifconfig-pool-persist ipp.txt
push "redirect-gateway def1 bypass-dhcp"
push "dhcp-option DNS 8.8.8.8"
push "dhcp-option DNS 8.8.4.4"
keepalive 10 120
tls-crypt devvpn.tlsauth
cipher AES-256-CBC
compress lz4-v2
push "compress lz4-v2"
user nobody
group nobody
persist-key
persist-tun
status openvpn-status.log
log /var/log/openvpn.log
verb 3
remote-cert-eku "TLS Web Client Authentication"
Now run the below command to generate the authentication file that will be used by the clients.
sudo openvpn --genkey --secret /etc/openvpn/devvpn.tlsauthGenerating Certificates
First we will fill some values on an script that will be used as env variables to create certificates for both clients and server
sudo vim /etc/openvpn/easy-rsa/varsModify the below data as needed
export KEY_COUNTRY="MX"
export KEY_PROVINCE="Jal"
export KEY_CITY="Zapopan"
export KEY_ORG="Development"
export KEY_EMAIL="donhk@example.org"
export KEY_EMAIL=donhk@example.org
export KEY_CN=localhost
export KEY_NAME="vuser1"
export KEY_OU="development"
Now just source them
cd /etc/openvpn/easy-rsa
source ./vars
Note run ./clean-all only the first time you do this or you will erase all the existing certificates and you will need to start over
Creating The Server Certificate
./build-ca
./build-key-server server
./build-dh
Now we just need to copy the certificate to the keys folder
cd /etc/openvpn/easy-rsa/keys
sudo cp dh2048.pem ca.crt server.crt server.key /etc/openvpn
Creating client keys
cd /etc/openvpn/easy-rsa
./build-key vuser1
Repeat as needed for the number of users you want

Starting VPN server
sudo systemctl enable openvpn@server.service
sudo systemctl start openvpn@server.service
sudo systemctl status openvpn@server.service

Now let’s switch to the client side.

Configuring an OpenVPN client (CentOS)
Make sure it has the tun/tap module enabled
sudo modprobe tun
lsmod | grep tun
copy from the server side the below files

you will find them under, copy them somewhere in the client and change the permissions to 600
/etc/openvpn/easy-rsa/keys/ca.crt
/etc/openvpn/easy-rsa/keys/vuser*.crt
/etc/openvpn/easy-rsa/keys/vuser*.key
/etc/openvpn/devvpn.tlsauth
Now install the open VPN software and create the configuration file
sudo yum install -y openvpn
sudo vim /etc/openvpn/client.conf
add the below lines where x.x.x.x is the public ip that appears on the OC panel
client
tls-client
remote-cert-tls server
ca /home/donhk/.keys/ca.crt
cert /home/donhk/.keys/vuser1.crt
key /home/donhk/.keys/vuser1.key
tls-crypt /home/donhk/.keys/myvpn.tlsauth
proto tcp
remote X.X.X.X 1194 tcp
dev tun
topology subnet
cipher AES-256-CBC
log /var/log/openvpn.log
pull
finally just start the service
sudo systemctl start openvpn@client.service
sudo systemctl status openvpn@client.service
if the above command fails, try changing the settings of SELinux to a permissive
sudo cat /var/log/openvpn.log
OpenSSL: error:0200100D:system library:fopen:Permission denied
if everything is fine, you will see the below output

also you will have a new NIC on your system

and you will be able to ping the server from the client and vice versa


What is next?
Pretty cool, but all of this is just the preparation for what is coming, we will use the CentOS machine as staging before actually moving the code onto the production hardware (the raspberry) the next part will be how can we read the stream from the camera and save them on the server side.

4 thoughts on “Creating a video storage system [part1]”