
Set up a media server on a Raspberry Pi and access it from anywhere
[Safe harbor statement] This is not a tutorial, in fact, the below will be a mental dump of what I did to setup my PLEX instance, depending on when you see the below content, it might work or not, you know, the software tends to change from version to version and some features/options become invalid or they are just completely taken away (yeah, sometimes I hate it too)

[Warning]this will be a long post
let’s go to the action 🙂
[Motivation] I was at home bored and I was listening to some good music on youtube whereas I was coding some good stuff but suddenly the god of youtube decided that the right recommendation after a Rammstein track would be a Celso piña cumbia and just couldn’t stand it, so, I decided that I needed to carry around my music (500GB of good music collected during my through college) and you know, since I’m an engineer, I simply can not just use Spotify, that is too boring.

[What is the goal?] We want to be able to listen to our music from any place, any moment using almost only electronic waste 😀
[Materials]
- We need the cheapest VPS we can find
- We need an old computer [I’m using a pi]
- An external drive (I know you have one that you use to keep your door open :v)
- patience (the more the better)
Edit 2020: check this new version using free resources from Oracle cloud
[Mode A][setting up the everything on the vps]
I won’t dig a lot on this version since this was my first attempt but it didn’t go well 🙁
what is the idea? you have the following scenario
- You have VPS which doesn’t have more than 20G of storage
- Most likely your home network is behind of a NAT network
this means that we only have a directional data connection with the VPS

we can ssh into the VPS but not backward, how to solve this? we need to set up a VPN, once the VPN is done we will have bidirectional communication, after this, we can make use of a remote file system, to do so, it can be used either SSHFS, SAMBA or NAS, basically, it would leave us with something like this

in this way what happens is that you are mounting the file system with something like this
sshfs piuser@10.8.0.5:/mnt/externalhd /vps/far/drive
now you can access the files on the external drive attached to the pi as if they were on your server, the next task would be install plex on the VPS and put it work… yeah, that works, however, when I did it, my VPS provider was not happy about it, in fact, you will find that most VPS providers do not allow you to install software as PLEX on the VPS (yes, it sucks) I think it is because of the CPU usage or something like that, anyway, this leads us to the second approach.
Note: in order to use a remote file system, your kernel’s VPS should have enabled the support for such systems
cat /proc/filesystems
nodev cgroup
nodev devpts
nodev mqueue
 ext4
nodev nfs
nodev nfs4
nodev delayfs
nodev devtmpfs
nodev sysfs
nodev proc
nodev tmpfs
nodev binfmt_misc
nodev fusectl
nodev fuse
you must see something like above, the one that you want is fuse or cifs depending on what kind of remote file system you want to mount
another important thing is before attempting to set up a VPN ensure that your kernel has support for TUN/TAP if it does not have it, stop there and change your VPS provider because the one that you have is not worth it
[Mode B][Plex on the pi + VPN + port forwarding]
The way how we can make this work is by using a VPN + port forwarding, in this way, we will have the PLEX instance running on our local network and we will be able to access to it from the outside through a firewall rule that will forward our requests on a given port to the internal NAT network
[Warning] Yes, this gives creeps, so, make sure that you are protecting your computer before put it online :p

[VPS]
I will assume we are starting from scratch, the first thing to do is update our VPS, I recommend CenOS7 and thus, the below commands were tested on CentOS7 🙂
sudo su -
yum install -y update
yum install -y upgrade
yum install -y firewalld
yum install -y net-tools
now, let’s make sure that our firewall is up a running
systemctl start firewalld
systemctl enable firewalld
firewall-cmd --state
then we want to see the available network interfaces
ifconfig
lo: flags=73<UP,LOOPBACK,RUNNING> mtu 65536
 inet 127.0.0.1 netmask 255.0.0.0
...
venet0: flags=211<UP,BROADCAST,POINTOPOINT,RUNNING,NOARP> mtu 1500
 inet 127.0.0.1 netmask x.x.x.x broadcast 0.0.0.0 destination 127.0.0.1
...
venet0:0: flags=211<UP,BROADCAST,POINTOPOINT,RUNNING,NOARP> mtu 1500
 inet x.x.x.x netmask x.x.x.x broadcast x.x.x.x destination x.x.x.x
...
you might get something different, such as eth0
if you execute
firewall-cmd --get-active-zones
and you get nothing, you need to associate your network interface to one zone of the firewall (see links below to understand what is a zone)
firewall-cmd --zone=public--change-interface=venet0
now the get active zone will return something like
[donhk@vps ~]$ firewall-cmd --get-active-zones
public
interfaces: venet0
now we need to open some ports for the VPN
firewall-cmd --add-masquerade
firewall-cmd --permanent --add-masquerade
SHARK=$(ip route get 8.8.8.8 | awk 'NR==1 {print $(NF-2)}')
sudo firewall-cmd --permanent --direct --passthrough ipv4 -t nat -A POSTROUTING -s 10.8.0.0/24 -o $SHARK -j MASQUERADE
firewall-cmd --reload
we will use the default, you might want to change it later
firewall-cmd --zone=public --add-port=1194/tcp
vim /etc/sysctl.conf
add to the very first line
net.ipv4.ip_forward = 1
restart the network service
systemctl restart network.service
Note: there is a way to add the whole VPN service to the firewall to allow establish the connection, see links below, I had a hard time with it, that is why I better used the option of manually open the port
that is about the firewall for now
[ntp module]
it is important that the server and the client be in sync, to make sure of that we need to install the ntp module otherwise you will have conflicts on the client side, to do so
the below output corresponds to a server without ntp
timedatectl
 Local time: Sun 2018-04-01 19:29:27 UTC
 Universal time: Sun 2018-04-01 19:29:27 UTC
 RTC time: n/a
 Time zone: UTC (UTC, +0000)
 NTP enabled: no
NTP synchronized: no
 RTC in local TZ: no
 DST active: n/a
to install it
yum install -y ntp
systemctl start ntpd
systemctl enable ntpd
systemctl status ntpd
then to configure it
timedatectl set-timezone America/Mexico_City
timedatectl set-ntp true
to list an alternative timezone
timedatectl list-timezones
Africa/Abidjan
Africa/Accra
Africa/Addis_Ababa
optionally but recommended
edit /etc/ntp.conf and change the servers
for these
server 0.north-america.pool.ntp.org
server 1.north-america.pool.ntp.org
server 2.north-america.pool.ntp.org
server 3.north-america.pool.ntp.org
[easy-rsa]
quick and dirty way
wget -O /tmp/easyrsa https://github.com/OpenVPN/easy-rsa-old/archive/2.3.3.tar.gz
tar xfz /tmp/easyrsa
mkdir /etc/openvpn/easy-rsa
cp -rf easy-rsa-old-2.3.4/easy-rsa/2.0/* /etc/openvpn/easy-rsa
chown donhk /etc/openvpn/easy-rsa/
[OpenVPN]
vim /etc/openvpn/server.conf
port 1194
proto tcp
dev tun
ca ca.crt
cert server.crt
key server.key
dh dh2048.pem
topology subnet
server 10.8.0.0 255.255.255.0
ifconfig-pool-persist ipp.txt
push "redirect-gateway def1 bypass-dhcp"
push "dhcp-option DNS 8.8.8.8"
push "dhcp-option DNS 8.8.4.4"
keepalive 10 120
tls-crypt myvpn.tlsauth
cipher AES-256-CBC
compress lz4-v2
push "compress lz4-v2"
user nobody
group nobody
persist-key
persist-tun
status openvpn-status.log
log /var/log/openvpn.log
verb 3
remote-cert-eku "TLS Web Client Authentication"
generate the auth file
sudo openvpn --genkey --secret /etc/openvpn/myvpn.tlsauth
[Keys and Certificates]
mkdir /etc/openvpn/easy-rsa/keys
vim /etc/openvpn/easy-rsa/vars
export KEY_COUNTRY="MX"
export KEY_PROVINCE="Jal"
export KEY_CITY="Zapopan"
export KEY_ORG="Geeks"
export KEY_EMAIL="donhk@domain.com"
export KEY_EMAIL=sammy@domain.com
export KEY_CN=localhost
export KEY_NAME="server"
export KEY_OU="Community"
[Certificates creation]
cd /etc/openvpn/easy-rsa
source ./vars
The next step is to create a couple of certificates, we will create 3, one for the server, and 2 clients
./clean-all
./build-ca
this will create the certificates used to edify the sever
Note: When the connection to the VPN is established, both, the user and client need to be verified, the ca.crt file which was generated with the above step will be used by all the clients
the next step is to create the server keys
./build-key-server server
./build-dh
then, copy the generated stuff to the OpenVPN directory
cd /etc/openvpn/easy-rsa/keys
sudo cp dh2048.pem ca.crt server.crt server.key /etc/openvpn
[clients certificates]
For each new client, these steps need to be followed
cd /etc/openvpn/easy-rsa
./build-key pibox #pibox is the name of this client
you will be prompted to a screen asking you for the client details, review carefully
KEY_CN=pibox #client hostname
then our second client certificates
cd /etc/openvpn/easy-rsa
./build-key winbox #this is for my windows machine
finally, we need to copy the OpenSSL config files
cp /etc/openvpn/easy-rsa/openssl-1.0.0.cnf /etc/openvpn/easy-rsa/openssl.cnf
now that almost all the server side is done, we can proceed to start up the OpenVPN service
systemctl start openvpn@server.service
systemctl enable openvpn@server.service
systemctl status openvpn@server.service
Note: The above command means to use systemctl to [start|enable|get status] from the OpenVPN service using the config file /etc/openvpn/server.conf
start will start it up, with enable it will be starting it up on boot time and the status is to see if all was as expected, what you should expect to see is something like below

if you don’t welcome to Linux hell, what you should do is take a look at
/var/log/openvpn.log
I hope you don’t need to but if you do, what usually goes wrong?
- You are using a different version (we use 2.4.x)
- Your machine’s kernel doesn’t have the tun module enabled
- You added an invalid parameter (combination of parameters) and the server can’t start
[Client config]
If you are not using a Raspberry Pi 3B (ARM machine) and instead you are using an old x86 computer, you can just install OpenVPN you continue reading, maybe you can learn something :p.
When working with ARM computers there are a little more extra steps, first, you must ensure that you are running on the very last version of the OS, in my case I was using ubuntu mate for pi but it was not yet available the version 2.4 of OpenVPN, if that is your case, I recommend you to format you pi and install a newer one, since I don’t have an external keyboard I opted for Raspbian stretch, if you do the same you will need only to execute
sudo apt-get install openvpn
sudo apt-get install net-tools
and I encourage you to increase the swap size (you might need it and if you do as I did, you would not want to do it when your indexing stuff)
vim /etc/dphys-swapfile
CONF_SWAPSIZE=2048
/etc/init.d/dphys-swapfile stop
/etc/init.d/dphys-swapfile start
now we can proceed with the install of plex, to do so see this
awesome, now we have Plex running on our small computer, from this point on, you should be able to reach your Plex instance on your home LAN, on your computer execute
hostname -I
and from another computer on your LAN, you should be able to see the log screen at
192.168.x.x:32400 #your ip port 32400
it will ask you to create an account, do it then you will be redirected

if you can’t see it, review whether you have a firewall and open the following ports
- TCP: 32400 (for access to the Plex Media Server) [required]
The following ports are also used for different services: - UDP: 1900 (for access to the Plex DLNA Server)
- TCP: 3005 (for controlling Plex Home Theater via Plex Companion)
- UDP: 5353 (for older Bonjour/Avahi network discovery)
- TCP: 8324 (for controlling Plex for Roku via Plex Companion)
- UDP: 32410, 32412, 32413, 32414 (for current GDM network discovery)
- TCP: 32469 (for access to the Plex DLNA Server)
make sure Plex is up
sudo service plexmediaserver start
sudo service plexmediaserver stop
sudo service plexmediaserver restart
repeat the steps to set ntp module on the client too
sudo apt-get install -y ntp
systemctl start ntpd
systemctl enable ntpd
systemctl status ntpd
timedatectl set-timezone America/Mexico_City
let’s configure the VPN client
from your VPS, download the client files
client one (pibox)
/etc/openvpn/easy-rsa/keys/ca.crt
/etc/openvpn/easy-rsa/keys/pibox.crt
/etc/openvpn/easy-rsa/keys/pibox.key
/etc/openvpn/myvpn.tlsauth
client two (another)
/etc/openvpn/easy-rsa/keys/ca.crt
/etc/openvpn/easy-rsa/keys/winbox.crt
/etc/openvpn/easy-rsa/keys/winbox.key
/etc/openvpn/myvpn.tlsauth
the files for the client two are for you, you can be used them on the device you want, those were only for educational purposes 😉
now, for the plex machine (in my case pibox)
- copy those file to some place on your client machine
- create the following file
/etc/openvpn/<span style="color:#ff0000;">client.conf</span>with the below content
client
tls-client
ca /home/donhk/open/ca.crt
cert /home/donhk/open/pibox.crt
key /home/donhk/open/pibox.key
tls-crypt /home/donhk/open/myvpn.tlsauth
proto tcp
remote X.X.X.X 1194 tcp
dev tun
topology subnet
cipher AES-256-CBC
log /var/log/openvpn.log
pull
script-security 2
up /etc/openvpn/update-resolv-conf
down /etc/openvpn/update-resolv-conf
make sure you replace the red lines with your values, and the blue with your server IP address, save and exit
What we are doing here is that we are creating a client config file which will pull the server configurations once connected, it includes the server defined DNS besides specifying the port, remote IP, cipher method, protocol to be used and client log location
let’s turn it on!
systemctl start openvpn@client.service
systemctl enable openvpn@client.service
systemctl status openvpn@client.service
now if you list the network interfaces you should see
lo: flags=73<UP,LOOPBACK,RUNNING> mtu 65536
inet 127.0.0.1 netmask 255.0.0.0
...
tun0: flags=4305<UP,POINTOPOINT,RUNNING,NOARP,MULTICAST> mtu 1500
inet 10.8.0.2 netmask 255.255.255.0 destination 10.8.0.2
...
wlan0: flags=4163<UP,BROADCAST,RUNNING,MULTICAST> mtu 1500
inet 192.168.x.x netmask 255.255.255.0 broadcast 192.168.x.x
...
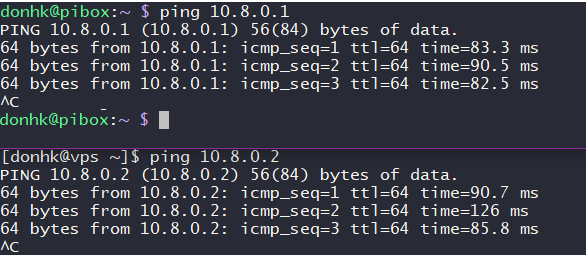
now you can ping the VPS and the VPSs can ping you
now, the last part is just adding a rule to our VPS firewall to redirect the traffic on a given port to our internet network
firewall-cmd --zone=public --add-forward-port=port=XXXXXX:proto=tcp:toport=32400:toaddr=10.8.0.2
pay special attention to the red parts, it means, it will redirect ant request on port XXXXXX to port 32400 of 10.8.0.2
now you can access your Plex server from anywhere 😀

this lives here

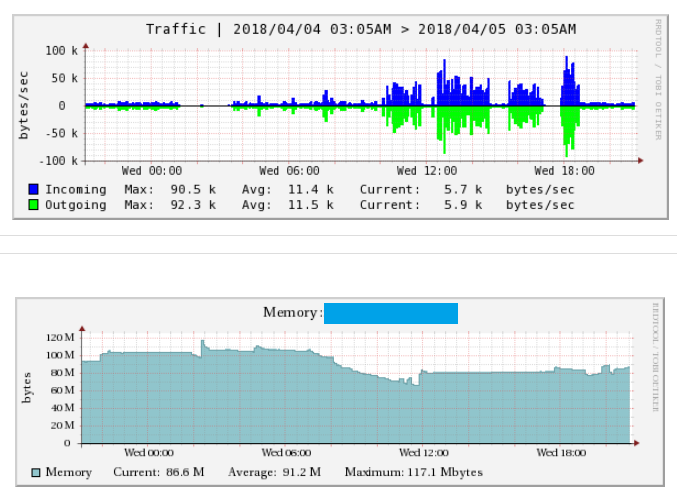
some useful insights, the VPS won’t notice the instance if you only use it to stream music, even some movies, the resources usage is very low
what is more, with this method you can do even cooler stuff like, create your own virtual machines and access to them from the outside or play around with distributed computing
Some other insights…yeah, after a few days and after putting my pi to scan my 500GB of data, I warn you that the process will be slow (in my case have been 3 days and counting)
Plex tends to create a lot of stuff whereas indexing due to the stuff it downloads and the transcoding, so, if you use a pi, make sure it has enough storage (I used a 32G memory and Plex so far has consumed 12GB ) after a couple of hours of indexing, you better restart Plex or you will have a meltdown
remeber the rule, do not talk about your Plex instance

[update] after one week of usage I finally migrate my plex onto another old machine that I had with a core i7, the files scan phase took forever on the pi and I only was scanning music, after 4 days of scanning files I needed to restart the plex service about once per day besides that I was getting kernel panic errors, I think it was too much for a small cpu, just fyi, once the scan finished, the pi was able to handle upto 3 connections for direct stream (no live trascoding)
if you find any typo please let me know :p
2 thoughts on “Set up a media server on a Raspberry Pi and access it from anywhere”